You’ll adore this straightforward guide to creating the ideal layer cake. I’ll demonstrate how to get the pans ready, smooth the cake, and decorate it as well. There will be something new to try in baking, regardless of your skill set. A layer cake requires several different steps, and I know it could be daunting. It is much simpler to understand if you take it to step by step, though. just bake the cake sections first, construct the cake the following day, but then just frost it.
- Get the ingredients ready.
- Get the pans ready and filled.
- Pile, construct, then frost the cake after baking and cooling it.
- Decorate
See how to Hire pastry Chefs here
How much time should I bake my layer cakes?
The time given is only a general recommendation because baking times would always fluctuate. Your particular oven and the kind of cookware you’re utilizing both have an impact on this. Not always cake, but other baked items also hold to this! Also because pans aren’t packed uniformly, not all layers bake for the same period. If you have the additional time, measuring out the fluid batter for each pan is always preferable. Set up your timer for the standard minimum amount of time, inspect your cake, and add more time as necessary.
Methods to level a cake (torte)
A cake layer is torted or leveled by eliminating the domes on the topping of every layer to create a smooth, solid surface. The layers won’t be able to slide around as a result. My favorite tool for ensuring consistent layering is my cake leveler. Alternatively, it’s recommended to use a serrated knife. Slice as precisely as you can while maintaining eye level with the cake. Being patient is key when dealing with an extremely moist cake.
How to put together and decorate a layer cake
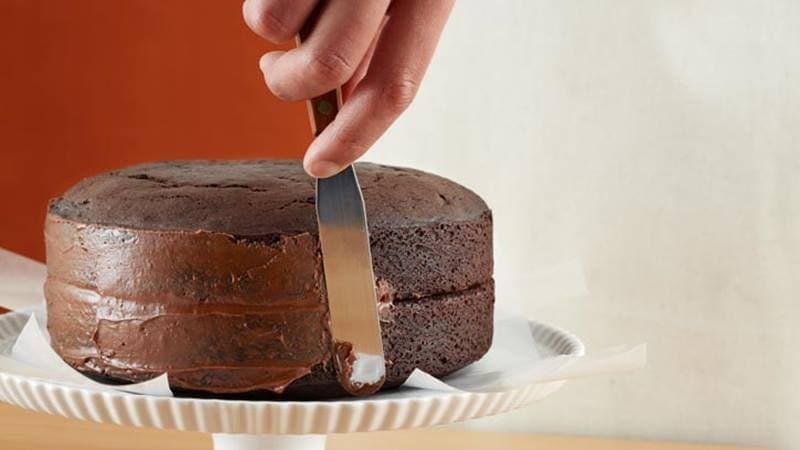
- It’s essential to ice your cake after it has baked, cooled, and been leveled. Two key components of a sturdy layer cake are uniformly frosted layers and the use of particularly stable icing.
- First, spread some frosting here on a plate or cake platter you’ll be arranging your cakes on. This makes it more difficult for the cake to slide about. Here on the cake board, put the bottom layer in the center.
- Use a piping bag to evenly pipe a coating of frosting (note, we desire lovely, level layers!). From the outer edge to the center, pipe. You can simply clip the bag’s bottom off instead of using a piping tip. It can be buffed out with an angled spatula.
- Repeat the process with your additional (or third) layer, adding another layer of icing in between. When you’re prepared for the upper layer, I suggest creating it to make the cake’s top as level as possible. You’ll see that the spaces here between layers are left.
- After adding the crumbling coat, seal in the spaces. A thin frosting coating that is put before the top layer is called a crumb coat. The crumb coat’s goal is to gather any leftover crumbs so they do not even mix with the frosting’s upper layer. Fill in those spaces with your piping bag and keep spreading it out to form the crumb coat.